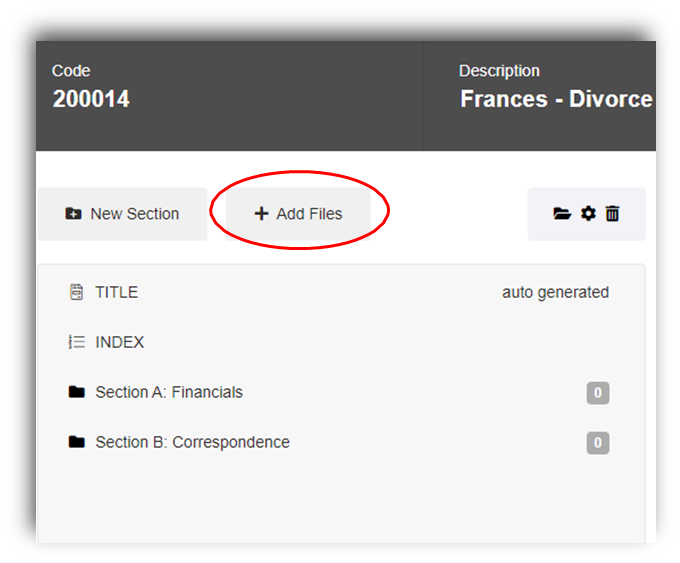
Adding Files – Manual Way

Once your sections have been created and you are ready to start importing into Productivity: -
1. Select the 'Add Files' button
Import from PMS
Select the 'Import from PMS' button
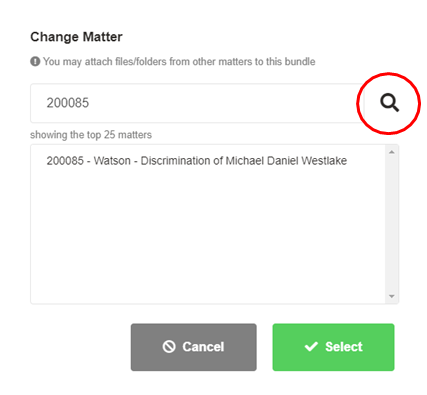
Change Matter
You can import from a different matter within your integrated PMS by: -
1. Selecting the ‘Change Matter’ icon
2. Type in the matter you would like to import from
3. Press the magnifying glass to search
4. Select on the matter
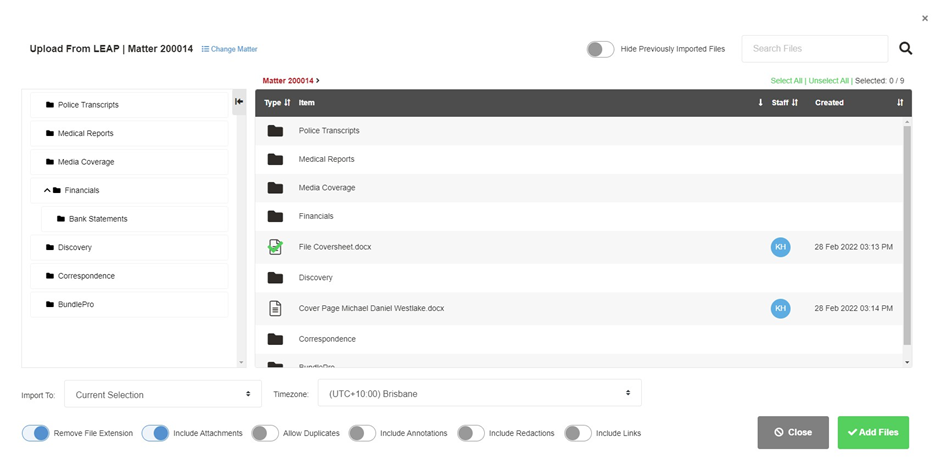
The import from PMS screen will reload to show all documents/folders within the different matter.
Please note that the order you select on your documents, is the order that they will appear in your bundle.
Hide Previously Imported Files
This feature helps prevent duplicate documents being added to your bundle. You can choose to hide the previously imported files.
Import To
The ‘Import to:’ is where you can control which section your documents will import to.
Remove File Extension
Removal of file extension feature will remove the .docx, .pdf from the end of your document descriptions.
Include Attachments
By default, Productivity will include any attachments when importing emails, but you can turn this off if you require only the email body.
Allow Duplicates
By default, Productivity does not allow you to import duplicate documents. Instead, a green tick will appear once a document has been added. If you require a document to be added more than once, toggle off the ‘Allow Duplicates’ button.
Include Annotations
Use this feature to include any annotations already created throughout the imported document. Productivity will capture the username, comment, and selected text relating to the annotation.
Include Redactions
Use this feature to include any applied or unapplied redactions already created throughout the imported document. Productivity will capture the username and comment relating to the redaction.
Include Links
Use this feature to include any hyperlinks already created throughout the imported document. Productivity will capture the username, comment, and allow the hyperlink to be clickable within your generated bundle.
Timezone
This feature includes worldwide time zones. Upon import, the time zone is set automatically to the time zone you are currently in.
E.g., You receive an email at 1:30am on the 31st of May from London, UK. Productivity will set the date and time zone of the document to reflect Brisbane, AUS which would be 10:30am on the 31st of May.
Import from a Local File
You can import documents from a local file, whether this be a USB, G:Drive, Documents, Desktop, Downloads etc.
Tip: To select/highlight multiple documents, hold down the ‘Shift’ button on your keyboard.
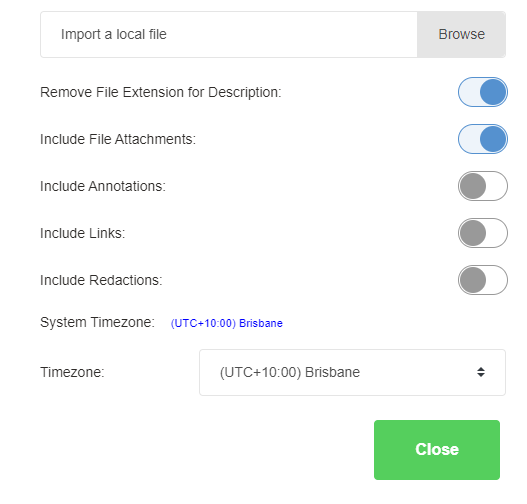
Removal of File Extension
Removal of file extension feature will remove the .docx, .pdf from the end of your document descriptions.
Include File Attachments
By default, Productivity will include any attachments when importing emails, but you can turn this off if you require only the email body.
Include Annotations
Use this feature to include any annotations already created throughout the imported document. Productivity will capture the username, comment, and selected text relating to the annotation.
Include Links
Use this feature to include any hyperlinks already created throughout the imported document. Productivity will capture the username, comment, and allow the hyperlink to be clickable within your generated bundle.
Include Redactions
Use this feature to include any applied or unapplied redactions already created throughout the imported document. Productivity will capture the username and comment relating to the redaction.
Timezone
This feature includes worldwide time zones. Upon import, the time zone is set automatically to the time zone you are currently in.
E.g., You receive an email at 1:30am on the 31st of May from London, UK. Productivity will set the date and time zone of the document to reflect Brisbane, AUS which would be 10:30am on the 31st of May.